建立於: 8年前 ( 更新: 8年前 )
前言
這篇文章,分享使用MacOS上的內建指令,進行Raspberry Pi的作業系統安裝。在這個安裝過程中關於dd指令,請小心指定您of的參數,即是write output到檔案的位置,
指定錯了,會毀掉自己的系統哦。
步驟
到官網下載官方的作業系統,本文我使用RASPBIAN。https://www.raspberrypi.org/downloads/
一、首先透過USB讀卡機,將Micro Sd卡接上Mac,再用指令查看掛載。
diskutil list
可以看見,在我的例子中,我的Micro Sd卡是在/dev/disk3。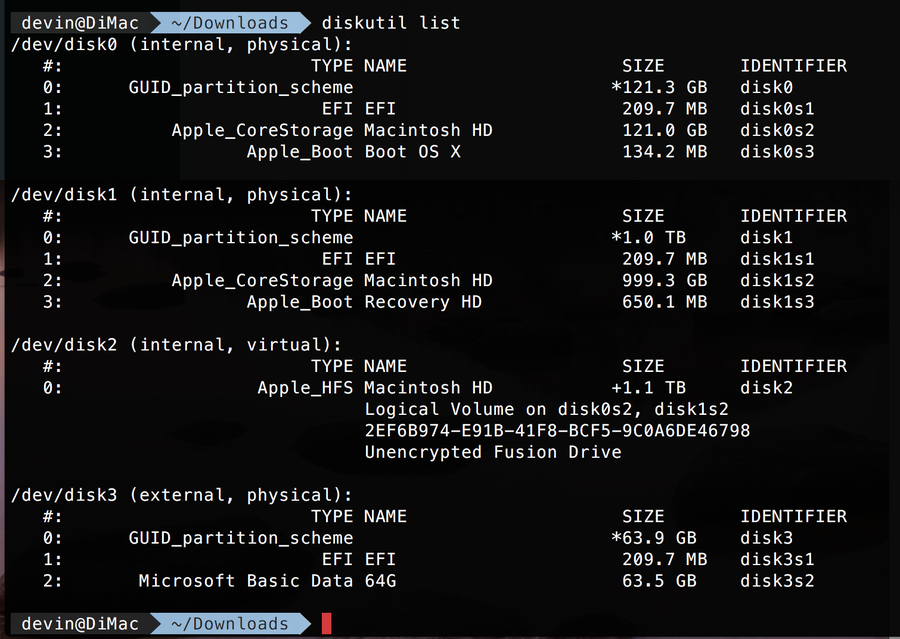
二、 解除掛載指令如下:disk[n]的磁碟編號請依您自己的實際情況調整。
diskutil unmountDisk /dev/disk3
成功unmount後,應可以看到文字如下,我成功解除disk3上掛載的所有卷宗。Unmount of all volumes on disk3 was successful
三、接下來就可以用dd指令,將下載下來的img檔,寫入到sd卡上囉。
將image寫入到rdisk3,使用rdisk3的速度會較快,如果您使用rdisk[n],失敗了,可改用disk[n],這裡的[n]磁碟的編號。
關於磁碟編號(disk[n])請勿照抄,請確實了解,您自己要寫入sd卡的編號是多少,例如/dev/disk4。
sudo dd bs=1m if=2018-03-13-raspbian-stretch.img of=/dev/rdisk3 conv=sync
這裡補充一下rdisk的說明參考:
/dev/rdisk nodes are character-special devices, but are "raw" in the BSD sense and force block-aligned I/O. They are closer to the physical disk than the buffer cache. /dev/disk nodes, on the other hand, are buffered block-special devices and are used primarily by the kernel's filesystem code.
關於 dd 指令的使用說明,我們可在終端機打
man dd 查看,按 q 可以離開。在 Linux 的世界,以 Linux 系統管理者來說,dd指令應該是一個好用基本必學的指令哦。
如果以英文單字的記憶打比方,那麼dd指令,肯定是一個值得記憶的單字,不會是那種一輩子可能看不到一次的冷門不需記憶單字。
這裡列出,conv=sync的說明。
sync Pad every input block to the input buffer size. Spaces are used for pad bytes if a block oriented con-
version value is specified, otherwise NUL bytes are used.
結果如下:version value is specified, otherwise NUL bytes are used.

完成後,就可以取出micro sd卡,裝到Raspberry Pi上開開看囉。


No Comment
Post your comment